
Worm Composting DIY
By: Jordan Hoffman
Production Assistant AmeriCorps Member
Whether you’re an environmentalist, a gardener, or just looking for a way to reduce how often you have to take out your trash (guilty), worms are here to help you. I like to think of them as low-maintenance pets that take care of my food waste and feed my plants. All you have to do is build them a home and feed them your food scraps, and they give you beautiful compost you can use to nourish your plants. If you grow edible food, worms help you turn your old food into your new food!
If you couldn’t tell from my enthusiasm, I’m a bug person. The best part about worm composting, though, is that you don’t have to be a bug person to do it–although you might become one in the process.
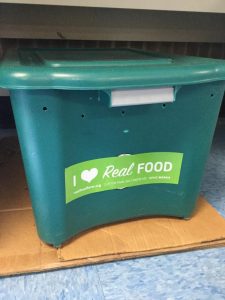
The Home/ Compost Bin
Here’s what our demo bin looks like at Real Food Farm and the supplies you’ll need to build your worms a home:
Bin with locking lid- The bin can be built according to whatever size you need. Consider how much food you’ll be adding to your bin–if you think you’ll have a lot, use a bigger bin. The only requirements are that it’s at least 8 inches deep & it has a lid. One suggestion from the Oklahoma Department of Environmental Equality is one square foot of surface area per pound of food per week or two feet of surface area per person.
Drill- To prepare your bin drill quarter-inch holes in the bottom & around the top of the bin. The holes can be spaced about two inches apart. Although as a far-from-handy woman I can vouch for this as being easier than it seems to build, if the thought of building your own bin is so intimidating that it’s keeping you from starting, there are options available for purchasing your own bin. Be warned, though, they can be pricey!
Blocks & Tray- The holes in the bin are designed to drain out any excess water. You will need a tray to place bin on to catch any extra liquid (a second lid or shallow plastic bin work well). Place the worm bin up on blocks and then put it inside the second container. You will need to check on this extra liquid and drain it out when it collects. However, by adding a layer of cardboard and newspaper at the bottom of your bin, you may be able to soak up a lot of this extra moisture to avoid having to do this step.
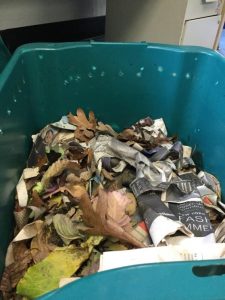
The Bedding
Bedding for your worm composting system is crucial for balancing out your nitrogen-rich food scraps with a source of carbon. You can make carbon-rich worm bedding out of anything made from woody materials such as dried leaves, black & white newspaper (the dyes in color newspaper are harmful to the worms!), cardboard (egg cartons toilet paper rolls, flattened boxes… be careful to remove adhesives and labels though), sawdust from natural logs.
I would recommend tearing up any big sources–tear newspaper into 1-2 inch wide strips and shred leaves if possible. Before adding them to the bin, you’ll want to wet your carbon sources (this is a little harder with dried leaves, so pair the leaves with one or more of the other things on the list) so they are damp but don’t drip when you squeeze them. Toss in a couple cups of potting soil & your worms before laying down 3-4 inches of the bedding. I laid my carbon down in a cross-hatch pattern, but I’ve seen other people take a more fluffy approach–pick your method, and let me know how it worked for you!
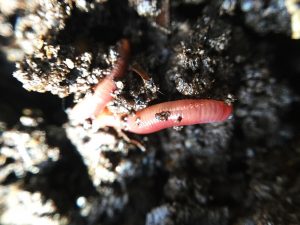
The Worms
When it’s time to get your worms, get red wrigglers. As common as earthworms are, most species of earthworms actually eat the bacteria that digest food rather than the food itself. They will still function in a composting system, but your food will decompose much slower. Additionally, since red wrigglers eat the food, they are much easier to separate from the compost when you’re ready to use it! Red wiggler worms can be purchased from a bait shop, online source, or from a farmer friend.
Worms prefer temperatures between 55 & 75 degrees. Pick a shady location so the worms are cooler in the summertime, and you may need to insulate your bin with hay bales or other methods in the winter. Another alternative is bringing a worm bin inside, although you will need to closely monitor the health of your compost as it can easily attract fruit flies.
Most recommendations for how many worms to get talk about weighing your food waste for a day. I don’t know about you, but 1) I don’t have a scale and 2) don’t have time for that. Here’s my very loose recommendation: when you’re starting out, start small. Worms will reproduce pretty quickly (fun fact that I only just learned at Real Food Farm: each worm is both male and female and will lay eggs! Are you a bug person yet?). As an individual, I started out with thirty worms, and that worked well for me.
Fun Fact: Worms don’t have teeth, they have gizzards. Some other animals have this as well–many people eat chicken gizzards! Gizzards are stomachs that grind up food with the help of ingested stones or other gritty particles. Earthworms use soil particles as grit!
The Food
Whenever you have food waste, all you have to do is lift the bedding and tuck the food scraps underneath it! Rotate where you tuck in the food scraps to ensure even distribution. Unfortunately, there are some foods that worms aren’t thrilled with.
Dos:
- Vegetable scraps
- Fruit peelings (some sources say to avoid citrus)
- Breads/grains
- Paper-based tea bags Be careful to remove any staples.
- Non-greasy leftovers
- Coffee grounds & filters (switch to non-bleached filters)
- Crushed egg shells
Don’ts:
- Meat
- Bones
- Dairy
- Greasy foods
For anything not on these lists, consider how long it takes to decompose. If it takes a long time to break down, there is a bigger chance for it to attract pests or cause the bin to smell.
 The Compost
If you have red wrigglers, getting compost ready for potting plants is easy! It usually takes 3-4 months depending on how many worms you started out with and how much food you add weekly. Check your bin weekly to look for compost & fluff up the bedding a bit. Your hands will get a bit dirty! The bin should smell earthy and be a little moist, if not check out the troubleshooting tips below.
When you’re ready to get compost, create a little pocket in your bin away from the compost and add fresh food scraps to that pocket. If your compost is truly finished, the worms should move away from the finished compost to the new food (you’ll be able to see the worms move!). While they’re enjoying their fresh meal, you can collect the compost without taking out any of your worms.
Troubleshooting
As easy as worm composting is, there are a couple things that can go wrong in the system. Fortunately, they’re easy to fix! Here are a few troubleshooting tips.
There’s a smell! This is the most common symptom of trouble in the bin. When worm composting systems are healthy, there shouldn’t be any smell. There are a couple of possibilities for the cause of the smell:
- Too much food: If you’ve just been adding more than usual lately and don’t plan on maintaining that amount, just slow down on adding food scraps for a bit. If it turns out you create more food waste than you imagined when you set up your bin, you might want to get more worms or even build a bigger bin!
- Not enough air: Mix up the contents! It helps to do this regularly with the bedding. Once a week should be sufficient.
- Too wet: Check the holes at the bottom to make sure they aren’t blocked; clear them if they are, and drill more holes if you need to.
- Too acidic: Cut back on adding coffee grounds, tomatoes, citrus, or other acidic foods & add some egg shells.
Fruit Flies! The same reasons usually apply…
- Too much food (see above)
- Food left exposed: This is why you have to tuck the food under the bedding–and why I use a cross-hatch method of bedding. All but one species of fruit fly feed on rotting food, so they’re always on the hunt for it. If you’re having trouble fully covering your worm food, add more bedding.
Stop adding food for a little bit, and check out ways to attract fruit flies away from your bin. To get rid of those flies, check out these tips: http://everydayroots.com/how-to-get-rid-of-fruit-flies. Method 1 is my personal favorite! You can use any jar but I’ve found bottles with narrow tops work a bit easier than a mason jar.
More on Compost
Worm bins are great for small scale composting and educational needs. At our farm, we use a larger hot compost system that you be a part of if you’re not able to compost at home. To learn more about our Compost Co-op click here!
About Real Food Farm
Real Food Farm works toward a just and sustainable food system by improving neighborhood access to healthy food, providing experience-based education, and developing an economically viable, environmentally responsible local agriculture sector.